Oreo Stuffed Chocolate Chip Cookies

Another long overdue post. I'm not sure when I baked these cookies but I think it was around last month. Didn't get the time to write up a proper post, and since I'm being so unproductive academic-wise tonight, I might as well be productive blog-wise :P
So, as you can tell from the title of this post, this recipe is about a cookie within a cookie. To be specific, an oreo cookie within a chocolate chip cookie. I first came across this idea from a really cute baking blog, Picky Palate. Every sweet tooth should really check this blog out! And really, the name of the recipe alone sounds fantastic - what's not to love about the idea of everyone's favourite sandwich cookie stuffed in a good old traditional chocolate chip cookie?
I still remember how these cookies came about. I was having a really bad day and I just had this overwhelming urge to bake. On the train home I suddenly thought of this recipe, and that I had a huge bag of mini oreos at home. The original recipe used normal-sized double stuffed oreos but I decided mini oreos could do too. I had to make two trips to two different supermarkets in a bid to find the cookie mix (the first supermarket I went to didn't stock it) but it was well worth it. No better therapy than baking, I say. My mood lifted the minute I plucked the box off the shelf. :)
These cookies are both ridiculously easy and ridiculously yummy. The recipe is a no-brainer - click on the link above for it! Basically, just follow the instructions on the box mix (I followed the original recipe and used Betty Crocker), then wrap up an oreo cookie with some cookie dough to make one proper stuffed cookie. As stated in the original recipe, remember to completely seal up your oreo cookie with the dough. It's a really cute surprise for your unsuspecting family and friends!
More notes: because I used mini oreos, I didn't use as much dough as the original recipe called for. I find that having two mini oreos within a cookie is much more satisfying than one. ;) Oh, and one more thing: sticking the dough into the fridge for a while helps - it hardens the dough slightly and makes it less sticky and easier to shape.
I'm having another bout of cookie craving already just looking through my old photos. Maybe it's time to whip up another batch? :P
Written on Sunday, February 19, 2012 at 12:27 AM
by huis
______
______
Red Wine Chocolate Cake... and a Happy New Year!
2011 will end in nearly five hours here! It's been a great year, and I have many things to be thankful for. Even though I don't have celebratory plans this New Year's Eve, I'm still pretty excited about the new year - both excited and nervous, to be honest - and what it will bring! I'm going to graduate and (hopefully) find a job that I will truly enjoy in 2012. It's not going to be an easy year. Bring it on, I say!
My last baking attempt of 2011 was the most yummylicious Red Wine Chocolate Cake, which I baked twice during the Christmas period as gifts for my family and friends. It's a really delicious cake. It's really soft but at the same time, a very solid cake - not the crumbly sort. The red wine taste is subtle and just right. Everyone loved it and there just wasn't enough to go around - I barely had enough for myself! :( Nevermind, though - I'm glad to have found such a keeper of a recipe that I can use many times in the new year!

I took the recipe from a cooking blog that I really enjoy reading, 17andbaking. I barely made any changes to the recipe, except for a few - I simply couldn't find Dutch cocoa powder here, so I used normal cocoa powder from Red Man, a local brand, but didn't make the adjustments indicated for natural-processed cocoa. The red wine I used wasn't any quality one either - it was some bottle that I picked up from the Airport's Duty-Free store :P. Lastly, I didn't have a tin that was exactly 9x5 inch; mine was slightly smaller but still worked. Anyhow, the cake turned out most delish anyway :)
Here's the recipe below. Enjoy, and Happy New Year! :)
Red Wine Chocolate Cake
Adapted from 17andbaking
Ingredients
1/2 cup (1 stick or 4 ounces) unsalted butter, softened
1 cup (6 7/8 ounces) firmly packed light brown sugar
1/2 cup (4 ounces) granulated sugar
1 large egg, at room temperature
3/4 cup red wine
1/4 cup plain yogurt
1 teaspoon vanilla extract
1 1/2 cups (6 3/4 ounces) all-purpose flour
3/4 cup (2 5/8 ounces) Dutch cocoa powder
1/4 teaspoon baking soda
1/2 teaspoon baking powder
1/4 teaspoon salt
Steps
Preheat the oven to 325 F. Butter and flour a 9×5″ loaf pan.
Beat the butter on medium speed with an electric mixer until smooth. Add the sugars and cream until lightened and fluffy, about 3 minutes. Beat in the egg until well combined, then mix in the wine, yogurt, and vanilla. The batter might look curdled, but don’t worry. Sift in the flour, cocoa, baking soda, baking powder, and salt. Stir with a spoon until there are no streaks of flour left, scraping down the sides of the bowl and being careful not to over mix.
Scrape the batter into the loaf pan and bake 60-70 minutes, or until a thin knife inserted into the center of the loaf comes out clean. Cool the loaf in the pan on a rack for 10-15 minutes, then run a knife around the edges and turn it out.
My last baking attempt of 2011 was the most yummylicious Red Wine Chocolate Cake, which I baked twice during the Christmas period as gifts for my family and friends. It's a really delicious cake. It's really soft but at the same time, a very solid cake - not the crumbly sort. The red wine taste is subtle and just right. Everyone loved it and there just wasn't enough to go around - I barely had enough for myself! :( Nevermind, though - I'm glad to have found such a keeper of a recipe that I can use many times in the new year!

I took the recipe from a cooking blog that I really enjoy reading, 17andbaking. I barely made any changes to the recipe, except for a few - I simply couldn't find Dutch cocoa powder here, so I used normal cocoa powder from Red Man, a local brand, but didn't make the adjustments indicated for natural-processed cocoa. The red wine I used wasn't any quality one either - it was some bottle that I picked up from the Airport's Duty-Free store :P. Lastly, I didn't have a tin that was exactly 9x5 inch; mine was slightly smaller but still worked. Anyhow, the cake turned out most delish anyway :)
Here's the recipe below. Enjoy, and Happy New Year! :)
Red Wine Chocolate Cake
Adapted from 17andbaking
Ingredients
1/2 cup (1 stick or 4 ounces) unsalted butter, softened
1 cup (6 7/8 ounces) firmly packed light brown sugar
1/2 cup (4 ounces) granulated sugar
1 large egg, at room temperature
3/4 cup red wine
1/4 cup plain yogurt
1 teaspoon vanilla extract
1 1/2 cups (6 3/4 ounces) all-purpose flour
3/4 cup (2 5/8 ounces) Dutch cocoa powder
1/4 teaspoon baking soda
1/2 teaspoon baking powder
1/4 teaspoon salt
Steps
Preheat the oven to 325 F. Butter and flour a 9×5″ loaf pan.
Beat the butter on medium speed with an electric mixer until smooth. Add the sugars and cream until lightened and fluffy, about 3 minutes. Beat in the egg until well combined, then mix in the wine, yogurt, and vanilla. The batter might look curdled, but don’t worry. Sift in the flour, cocoa, baking soda, baking powder, and salt. Stir with a spoon until there are no streaks of flour left, scraping down the sides of the bowl and being careful not to over mix.
Scrape the batter into the loaf pan and bake 60-70 minutes, or until a thin knife inserted into the center of the loaf comes out clean. Cool the loaf in the pan on a rack for 10-15 minutes, then run a knife around the edges and turn it out.
Written on Saturday, December 31, 2011 at 7:04 PM
by huis
______
______
Upside Down Apple Cake
I am currently in the midst of my school holidays (my final ones, I might add), finally free from studying and examinations - at least for a short while. Doing a thesis means that I'm not exactly free from the clutches of school even now, but still, I appreciate the break. It's refreshing being able to wake up at 11am, to be able to walk down the empty streets of town on Monday afternoons, go out for family lunches and dinners, pick seashells by the beach, window shop, etc, etc, and of course, finally get down to baking.
I hadn't forgotten my resolution to bake every month. However, I didn't keep to it - life just got in the way and I found myself unable to take time out to do so. I feel guilty, but I've also come to realize that baking, being a leisurely pasttime, a hobby, shouldn't be something that I'm striving so hard to achieve. The resolution was like some sort of target or quota I had to meet. That kind of takes the fun out of the whole process.
So, now resolution-free, I decided to kickstart my holiday baking with something different.
I've been sticking pretty much to the safe side of baking - meaning, I kept trying out similar recipes. Typically, they included chocolate. I love chocolate, and it was hard finding something else to bake partly because there are SO MANY chocolate recipes that I want to try. However, I think it's time I widen my baking experience a little ;)
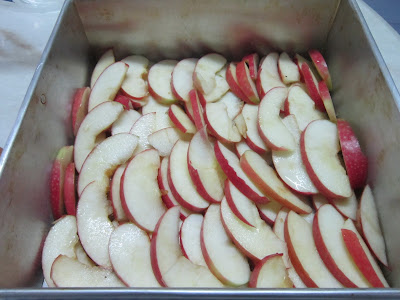
When I saw the recipe for an Upside Down Apple Cake at Stephanie's Kitchen, I knew this was going to be the something different I wanted to try. I've never baked with apples, and the idea of an upside down cake with soft, gooey, yummy apples layered on top sounded so good. This isn't a difficult recipe, and fresh out of the oven, this cake is absolutely delicious. I was popping pieces of cake in my mouth even as I was cutting it up.
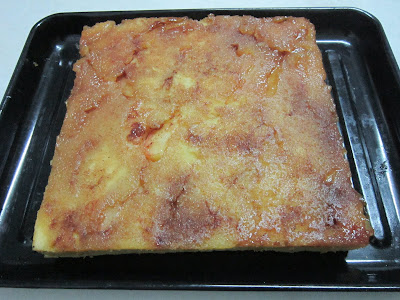
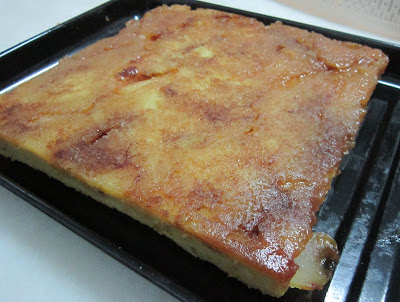
I felt that this cake tastes best warm and fresh out of the oven. Even though I hadn't any, I imagine that it'd be heaven paired with a scoop of vanilla ice cream. Two days later, the cake became more moist and pudding-like, and while that may appeal to some, I prefer a more cakey texture to go with the apples.
It sure feels good to be able to bake again, and I'm really in a baking/cooking mood these days. In fact, so much so that I've already planned what to bake next! Updates soon! :)
Click on the link mentioned above if you want the recipe!
I hadn't forgotten my resolution to bake every month. However, I didn't keep to it - life just got in the way and I found myself unable to take time out to do so. I feel guilty, but I've also come to realize that baking, being a leisurely pasttime, a hobby, shouldn't be something that I'm striving so hard to achieve. The resolution was like some sort of target or quota I had to meet. That kind of takes the fun out of the whole process.
So, now resolution-free, I decided to kickstart my holiday baking with something different.
I've been sticking pretty much to the safe side of baking - meaning, I kept trying out similar recipes. Typically, they included chocolate. I love chocolate, and it was hard finding something else to bake partly because there are SO MANY chocolate recipes that I want to try. However, I think it's time I widen my baking experience a little ;)

When I saw the recipe for an Upside Down Apple Cake at Stephanie's Kitchen, I knew this was going to be the something different I wanted to try. I've never baked with apples, and the idea of an upside down cake with soft, gooey, yummy apples layered on top sounded so good. This isn't a difficult recipe, and fresh out of the oven, this cake is absolutely delicious. I was popping pieces of cake in my mouth even as I was cutting it up.


I felt that this cake tastes best warm and fresh out of the oven. Even though I hadn't any, I imagine that it'd be heaven paired with a scoop of vanilla ice cream. Two days later, the cake became more moist and pudding-like, and while that may appeal to some, I prefer a more cakey texture to go with the apples.
It sure feels good to be able to bake again, and I'm really in a baking/cooking mood these days. In fact, so much so that I've already planned what to bake next! Updates soon! :)
Click on the link mentioned above if you want the recipe!
Written on Sunday, December 11, 2011 at 12:10 AM
by huis
______
______
Chocolate Marble Cake
There is nothing more heartwarming than a dish well-remembered from childhood. I'm fortunate enough to have plenty of those. They include home-cooked dishes with rice, the simplest and most homely chocolate cake I've ever had from my old neighbourhood bakery, and round sandwich cookies with a sweet, chewy jam centre.
And then there's marble cake.
Funnily enough, I didn't start out liking marble cake. It was a frequent appearance for breakfast and afternoon snacks, but it was more popular with my mum and sister. I didn't hate it, but I didn't particularly like the taste either. Gooey, creamy cakes were more my thing.
Perhaps you could say that my taste has changed as I grew older, or maybe it's simply an acquired taste for me. I now appreciate marble cake for how simple it is - both to make and to eat. Good on its own, even better with a mug of steaming coffee.
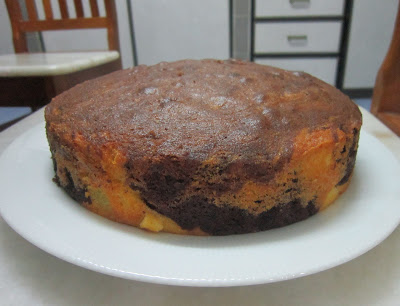
I made this cake on 9th August, National Day. I proclaim it my birthday cake to Singapore - I mean, it's only fitting that I present a cake I grew up on to the country I grew up in, right? ;)
This recipe is a keeper. It's so simple and fuss-free, and with wonderful results. The texture is perfect. The chocolate was just right. And I absolutely love how yellow the cake is. It has always seemed a bit miraculous to me, silly as it sounds - how does marble cake get so yellow when you don't add any yellow food colouring?

To celebrate the fact that I was baking a whole cake for no special reason (it's kind of a big deal for me, seeing how cupcakes and cookies are more typically my thing), I went out and bought an 8-inch cake tin. I'm glad I used that instead of my 9-inch one. I love fat, springy cakes, and I imagine that it'd have been much flatter if I had used a larger tin.
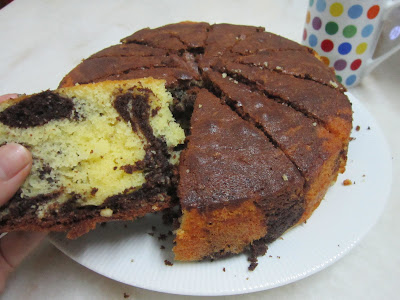
I took the recipe from BBC. Judging from the number of positive reviews on the website, you definitely can't go wrong!
Enjoy! :)
And then there's marble cake.
Funnily enough, I didn't start out liking marble cake. It was a frequent appearance for breakfast and afternoon snacks, but it was more popular with my mum and sister. I didn't hate it, but I didn't particularly like the taste either. Gooey, creamy cakes were more my thing.
Perhaps you could say that my taste has changed as I grew older, or maybe it's simply an acquired taste for me. I now appreciate marble cake for how simple it is - both to make and to eat. Good on its own, even better with a mug of steaming coffee.

I made this cake on 9th August, National Day. I proclaim it my birthday cake to Singapore - I mean, it's only fitting that I present a cake I grew up on to the country I grew up in, right? ;)
This recipe is a keeper. It's so simple and fuss-free, and with wonderful results. The texture is perfect. The chocolate was just right. And I absolutely love how yellow the cake is. It has always seemed a bit miraculous to me, silly as it sounds - how does marble cake get so yellow when you don't add any yellow food colouring?

To celebrate the fact that I was baking a whole cake for no special reason (it's kind of a big deal for me, seeing how cupcakes and cookies are more typically my thing), I went out and bought an 8-inch cake tin. I'm glad I used that instead of my 9-inch one. I love fat, springy cakes, and I imagine that it'd have been much flatter if I had used a larger tin.

I took the recipe from BBC. Judging from the number of positive reviews on the website, you definitely can't go wrong!
Enjoy! :)
Labels: cake, chocolate, marble cake
Written on Tuesday, August 16, 2011 at 1:27 PM
by huis
______
______
Flourless Chocolate Cookies
I have made a resolution. Now, I know myself very well when it comes to resolution-making. I tend to hold up pretty well the first few months, then I - for want of a better word - regress. I procrastinate, whine, complain, or just plain forget... and the resolution becomes naught.
I really hope that this time round things will be different, because this particular resolution is of great relevance to this blog.
I've resolved to bake or cook at least twice a month. Every month - even the busiest, schoolwork-filled ones. Two times may not sound like a lot to some, but I have to be realistic with myself (and my finances). That, and the fact that my folks start to grumble about electricity bills when I use the oven a bit too much.
In a way, this will be healthy for me in a spiritual sense. I've always found baking extremely therapeutic, so during the exam period this may actually do me some good! I've even gotten a cute notebook to record down what I bake every month. Sounds lame but I really enjoy recording things (weird, I know) so it makes this all the more fun!
So. Anyway, kicking off this resolution is my first baking attempt of August 2011: flourless chocolate cookies!

The thing that attracted me most about this recipe is the lack of flour and butter. How could it be? It seems like icing sugar is the substitution here. Anyway, the recipe seems easy enough, and saves money on ingredients... so I thought, why not?
These cookies are best consumed right out of the oven, warm and gooey and fudgy and sticky. Sadly, most of mine turned out to be any shape but round. Any advice on how to make cookies round, people?
These cookies are still good when they cool. My sister's friend loved them, but I felt they weren't spectacular or anything. Maybe it's because they are no longer fudgy and sticky once cooled, and I feel like the whole point of the cookie is lost then.

I do love how glossy the cookies look though. :)
I took the recipe from Recipe Girl. Click on the link for the original recipe!
On a side note, when you bake at midnight with a recipe that only calls for egg white, all the excess egg yolk can only mean one thing...

... A very eggy, very yellow supper! I could have fixed something more presentable, like pudding, but I'm still a novice at cracking eggs and the majority of the yolks broke :(
So... one down for the month. What to make for my 2nd attempt of August? *ponders... till the next post!*
I really hope that this time round things will be different, because this particular resolution is of great relevance to this blog.
I've resolved to bake or cook at least twice a month. Every month - even the busiest, schoolwork-filled ones. Two times may not sound like a lot to some, but I have to be realistic with myself (and my finances). That, and the fact that my folks start to grumble about electricity bills when I use the oven a bit too much.
In a way, this will be healthy for me in a spiritual sense. I've always found baking extremely therapeutic, so during the exam period this may actually do me some good! I've even gotten a cute notebook to record down what I bake every month. Sounds lame but I really enjoy recording things (weird, I know) so it makes this all the more fun!
So. Anyway, kicking off this resolution is my first baking attempt of August 2011: flourless chocolate cookies!

The thing that attracted me most about this recipe is the lack of flour and butter. How could it be? It seems like icing sugar is the substitution here. Anyway, the recipe seems easy enough, and saves money on ingredients... so I thought, why not?
These cookies are best consumed right out of the oven, warm and gooey and fudgy and sticky. Sadly, most of mine turned out to be any shape but round. Any advice on how to make cookies round, people?
These cookies are still good when they cool. My sister's friend loved them, but I felt they weren't spectacular or anything. Maybe it's because they are no longer fudgy and sticky once cooled, and I feel like the whole point of the cookie is lost then.

I do love how glossy the cookies look though. :)
I took the recipe from Recipe Girl. Click on the link for the original recipe!
On a side note, when you bake at midnight with a recipe that only calls for egg white, all the excess egg yolk can only mean one thing...

... A very eggy, very yellow supper! I could have fixed something more presentable, like pudding, but I'm still a novice at cracking eggs and the majority of the yolks broke :(
So... one down for the month. What to make for my 2nd attempt of August? *ponders... till the next post!*
Written on Monday, August 8, 2011 at 3:08 PM
by huis
______
______
Cinnamon Sugar Donut Muffins

I was bored at work on Monday when the urge to bake suddenly hit me. Just like that - it was spontaneous and unexpected and screaming to be satisfied. Along with that urge was an enormous craving for something cinnamon-y.
What else could I do? I responded to this the way any normal person would - I abandoned my work at once and began scouring the Internet for cinnamon recipes.
I wanted something easy to make but still cinnamon-y enough. Cinnamon rolls were out of the question because much as I want to make them someday, I didn't have the time or patience to wait for the dough to rise. Neither do I have a rolling pin (sad I know). So it had to be something simple. It was a pretty difficult search, because it seems like almost everything cinnamon-y involves rolling and yeasting and rising. But after searching through several pages on Tastespotting, I finally found my answer.

Cinnamon Sugar Donut Muffins. The name itself is enticing enough, isn't it? And the best thing is, these are super easy to make. Just throw in ingredients, mix, bake, and bam! You're done. There were many blogs raving about these muffins and I decided to give it a shot.
My verdict: these muffins are scrumptious! Great texture, really pretty asthetic-wise, with a satisfyingly nice cinnamon taste. Even my mum, who doesn't like cinnamon or any other spices, liked it enough to have two for breakfast! This will be my go-to recipe if I ever crave something cinnamon-y and don't have enough time for something more complicated.
The original recipe had no cinnamon in the batter, only in the cinnamon sugar that the muffin is coated in. If you want a stronger cinnamon flavour, like I did, you can add some cinnamon powder into the batter itself, together with the flour and nutmeg etc. I added about 1/4 teaspoonful, and I like how it turned out. If you're a big cinnamon fan like me, then I would recommend that. :)

Cinnamon Sugar Donut Muffins
Adapted from Kokocooks, who had adapted this recipe from Baking Bites
Ingredients
¾ c sugar
1 large egg
1 ½ c all purpose flour
2 tsp baking powder
¼ tsp salt
¼ tsp ground nutmeg
¼ c vegetable oil
¾ c milk
1 tsp vanilla
3 Tbs sugar
1 tsp cinnamon
Directions
1) Preheat oven to 350˚F. Lightly coat a muffin tin with non-stick spray.
2) In a large bowl, beat together the sugar and egg until light in color.
3) In a small bowl, stir together the flour, baking powder, salt, and nutmeg (Add some cinnamon powder here if you want a stronger cinnamon flavour).
4) Pour dry mixture into the egg mixture and stir to combine. Add vegetable oil, milk, and vanilla, stirring until just combined.
5) Divide batter evenly into muffin tin, filling each cup about 2/3 full. Bake until a toothpick inserted into the center of a muffin comes clean, about 15-18 minutes. Let cool for 10 minutes, then remove muffins from tin.
6) In a small bowl, combine sugar and cinnamon. While the muffins are still warm, roll each one in the mixture, coating all sides with the cinnamon sugar.
Makes 12 muffins
Written on Friday, July 22, 2011 at 11:23 AM
by huis
______
______
For My Reference
Wishlist
Rolling Pin
Bundt Cake Pan
Baking Thermometer
Food Processor
To-Do List
Aglio Olio
Any kind of Tart
Blueberry Pie
Bread
Chicken Rice
Cinnamon Rolls
Chocolate Mousse
Ice-Cream
Lava Cake
Marble Cake
Perfect Whole Roasted Chicken
Pineapple Tarts
Potato Chips
Preserved Vegetable Duck Soup (咸菜鸭汤)
Scones
Tiramisu
Rolling Pin
Bundt Cake Pan
Baking Thermometer
Food Processor
To-Do List
Aglio Olio
Any kind of Tart
Blueberry Pie
Bread
Chicken Rice
Cinnamon Rolls
Chocolate Mousse
Ice-Cream
Lava Cake
Perfect Whole Roasted Chicken
Pineapple Tarts
Potato Chips
Preserved Vegetable Duck Soup (咸菜鸭汤)
Scones
Tiramisu
Written on Monday, July 18, 2011 at 12:01 PM
by huis
______
______
chronicles of a novice baker

Hello! My name is Huihui, but I prefer to go by the easier-to-pronounce Huis. I'm a fresh University graduate, having majored in Psychology, and am currently desperately looking out for a job! I'm a novice baker and cook, and this blog chronicles my various attempts at these two hobbies of mine. It's a long learning process and I'm enjoying every minute of it!
If you would like to tell me something regarding my posts, or if you just want to say hello, do drop me an e-mail here.
Links
● Personal Tumblr
● Photography Blog
● Flickr
● Baking Wishlist
Archives