Chocolate Marble Cake
There is nothing more heartwarming than a dish well-remembered from childhood. I'm fortunate enough to have plenty of those. They include home-cooked dishes with rice, the simplest and most homely chocolate cake I've ever had from my old neighbourhood bakery, and round sandwich cookies with a sweet, chewy jam centre.
And then there's marble cake.
Funnily enough, I didn't start out liking marble cake. It was a frequent appearance for breakfast and afternoon snacks, but it was more popular with my mum and sister. I didn't hate it, but I didn't particularly like the taste either. Gooey, creamy cakes were more my thing.
Perhaps you could say that my taste has changed as I grew older, or maybe it's simply an acquired taste for me. I now appreciate marble cake for how simple it is - both to make and to eat. Good on its own, even better with a mug of steaming coffee.
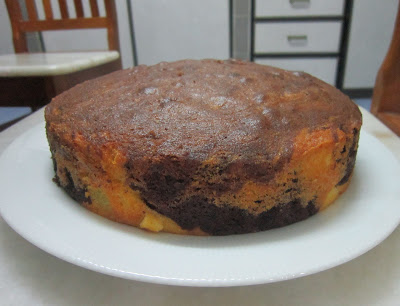
I made this cake on 9th August, National Day. I proclaim it my birthday cake to Singapore - I mean, it's only fitting that I present a cake I grew up on to the country I grew up in, right? ;)
This recipe is a keeper. It's so simple and fuss-free, and with wonderful results. The texture is perfect. The chocolate was just right. And I absolutely love how yellow the cake is. It has always seemed a bit miraculous to me, silly as it sounds - how does marble cake get so yellow when you don't add any yellow food colouring?

To celebrate the fact that I was baking a whole cake for no special reason (it's kind of a big deal for me, seeing how cupcakes and cookies are more typically my thing), I went out and bought an 8-inch cake tin. I'm glad I used that instead of my 9-inch one. I love fat, springy cakes, and I imagine that it'd have been much flatter if I had used a larger tin.
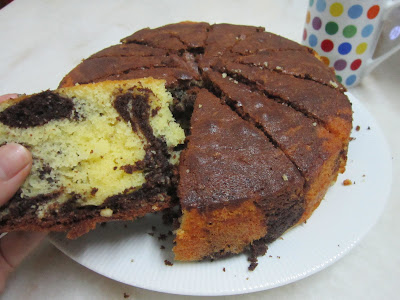
I took the recipe from BBC. Judging from the number of positive reviews on the website, you definitely can't go wrong!
Enjoy! :)
And then there's marble cake.
Funnily enough, I didn't start out liking marble cake. It was a frequent appearance for breakfast and afternoon snacks, but it was more popular with my mum and sister. I didn't hate it, but I didn't particularly like the taste either. Gooey, creamy cakes were more my thing.
Perhaps you could say that my taste has changed as I grew older, or maybe it's simply an acquired taste for me. I now appreciate marble cake for how simple it is - both to make and to eat. Good on its own, even better with a mug of steaming coffee.

I made this cake on 9th August, National Day. I proclaim it my birthday cake to Singapore - I mean, it's only fitting that I present a cake I grew up on to the country I grew up in, right? ;)
This recipe is a keeper. It's so simple and fuss-free, and with wonderful results. The texture is perfect. The chocolate was just right. And I absolutely love how yellow the cake is. It has always seemed a bit miraculous to me, silly as it sounds - how does marble cake get so yellow when you don't add any yellow food colouring?

To celebrate the fact that I was baking a whole cake for no special reason (it's kind of a big deal for me, seeing how cupcakes and cookies are more typically my thing), I went out and bought an 8-inch cake tin. I'm glad I used that instead of my 9-inch one. I love fat, springy cakes, and I imagine that it'd have been much flatter if I had used a larger tin.

I took the recipe from BBC. Judging from the number of positive reviews on the website, you definitely can't go wrong!
Enjoy! :)
Labels: cake, chocolate, marble cake
Written on Tuesday, August 16, 2011 at 1:27 PM
by huis
______
______
Flourless Chocolate Cookies
I have made a resolution. Now, I know myself very well when it comes to resolution-making. I tend to hold up pretty well the first few months, then I - for want of a better word - regress. I procrastinate, whine, complain, or just plain forget... and the resolution becomes naught.
I really hope that this time round things will be different, because this particular resolution is of great relevance to this blog.
I've resolved to bake or cook at least twice a month. Every month - even the busiest, schoolwork-filled ones. Two times may not sound like a lot to some, but I have to be realistic with myself (and my finances). That, and the fact that my folks start to grumble about electricity bills when I use the oven a bit too much.
In a way, this will be healthy for me in a spiritual sense. I've always found baking extremely therapeutic, so during the exam period this may actually do me some good! I've even gotten a cute notebook to record down what I bake every month. Sounds lame but I really enjoy recording things (weird, I know) so it makes this all the more fun!
So. Anyway, kicking off this resolution is my first baking attempt of August 2011: flourless chocolate cookies!

The thing that attracted me most about this recipe is the lack of flour and butter. How could it be? It seems like icing sugar is the substitution here. Anyway, the recipe seems easy enough, and saves money on ingredients... so I thought, why not?
These cookies are best consumed right out of the oven, warm and gooey and fudgy and sticky. Sadly, most of mine turned out to be any shape but round. Any advice on how to make cookies round, people?
These cookies are still good when they cool. My sister's friend loved them, but I felt they weren't spectacular or anything. Maybe it's because they are no longer fudgy and sticky once cooled, and I feel like the whole point of the cookie is lost then.

I do love how glossy the cookies look though. :)
I took the recipe from Recipe Girl. Click on the link for the original recipe!
On a side note, when you bake at midnight with a recipe that only calls for egg white, all the excess egg yolk can only mean one thing...

... A very eggy, very yellow supper! I could have fixed something more presentable, like pudding, but I'm still a novice at cracking eggs and the majority of the yolks broke :(
So... one down for the month. What to make for my 2nd attempt of August? *ponders... till the next post!*
I really hope that this time round things will be different, because this particular resolution is of great relevance to this blog.
I've resolved to bake or cook at least twice a month. Every month - even the busiest, schoolwork-filled ones. Two times may not sound like a lot to some, but I have to be realistic with myself (and my finances). That, and the fact that my folks start to grumble about electricity bills when I use the oven a bit too much.
In a way, this will be healthy for me in a spiritual sense. I've always found baking extremely therapeutic, so during the exam period this may actually do me some good! I've even gotten a cute notebook to record down what I bake every month. Sounds lame but I really enjoy recording things (weird, I know) so it makes this all the more fun!
So. Anyway, kicking off this resolution is my first baking attempt of August 2011: flourless chocolate cookies!

The thing that attracted me most about this recipe is the lack of flour and butter. How could it be? It seems like icing sugar is the substitution here. Anyway, the recipe seems easy enough, and saves money on ingredients... so I thought, why not?
These cookies are best consumed right out of the oven, warm and gooey and fudgy and sticky. Sadly, most of mine turned out to be any shape but round. Any advice on how to make cookies round, people?
These cookies are still good when they cool. My sister's friend loved them, but I felt they weren't spectacular or anything. Maybe it's because they are no longer fudgy and sticky once cooled, and I feel like the whole point of the cookie is lost then.

I do love how glossy the cookies look though. :)
I took the recipe from Recipe Girl. Click on the link for the original recipe!
On a side note, when you bake at midnight with a recipe that only calls for egg white, all the excess egg yolk can only mean one thing...

... A very eggy, very yellow supper! I could have fixed something more presentable, like pudding, but I'm still a novice at cracking eggs and the majority of the yolks broke :(
So... one down for the month. What to make for my 2nd attempt of August? *ponders... till the next post!*
Written on Monday, August 8, 2011 at 3:08 PM
by huis
______
______
Cinnamon Sugar Donut Muffins

I was bored at work on Monday when the urge to bake suddenly hit me. Just like that - it was spontaneous and unexpected and screaming to be satisfied. Along with that urge was an enormous craving for something cinnamon-y.
What else could I do? I responded to this the way any normal person would - I abandoned my work at once and began scouring the Internet for cinnamon recipes.
I wanted something easy to make but still cinnamon-y enough. Cinnamon rolls were out of the question because much as I want to make them someday, I didn't have the time or patience to wait for the dough to rise. Neither do I have a rolling pin (sad I know). So it had to be something simple. It was a pretty difficult search, because it seems like almost everything cinnamon-y involves rolling and yeasting and rising. But after searching through several pages on Tastespotting, I finally found my answer.

Cinnamon Sugar Donut Muffins. The name itself is enticing enough, isn't it? And the best thing is, these are super easy to make. Just throw in ingredients, mix, bake, and bam! You're done. There were many blogs raving about these muffins and I decided to give it a shot.
My verdict: these muffins are scrumptious! Great texture, really pretty asthetic-wise, with a satisfyingly nice cinnamon taste. Even my mum, who doesn't like cinnamon or any other spices, liked it enough to have two for breakfast! This will be my go-to recipe if I ever crave something cinnamon-y and don't have enough time for something more complicated.
The original recipe had no cinnamon in the batter, only in the cinnamon sugar that the muffin is coated in. If you want a stronger cinnamon flavour, like I did, you can add some cinnamon powder into the batter itself, together with the flour and nutmeg etc. I added about 1/4 teaspoonful, and I like how it turned out. If you're a big cinnamon fan like me, then I would recommend that. :)

Cinnamon Sugar Donut Muffins
Adapted from Kokocooks, who had adapted this recipe from Baking Bites
Ingredients
¾ c sugar
1 large egg
1 ½ c all purpose flour
2 tsp baking powder
¼ tsp salt
¼ tsp ground nutmeg
¼ c vegetable oil
¾ c milk
1 tsp vanilla
3 Tbs sugar
1 tsp cinnamon
Directions
1) Preheat oven to 350˚F. Lightly coat a muffin tin with non-stick spray.
2) In a large bowl, beat together the sugar and egg until light in color.
3) In a small bowl, stir together the flour, baking powder, salt, and nutmeg (Add some cinnamon powder here if you want a stronger cinnamon flavour).
4) Pour dry mixture into the egg mixture and stir to combine. Add vegetable oil, milk, and vanilla, stirring until just combined.
5) Divide batter evenly into muffin tin, filling each cup about 2/3 full. Bake until a toothpick inserted into the center of a muffin comes clean, about 15-18 minutes. Let cool for 10 minutes, then remove muffins from tin.
6) In a small bowl, combine sugar and cinnamon. While the muffins are still warm, roll each one in the mixture, coating all sides with the cinnamon sugar.
Makes 12 muffins
Written on Friday, July 22, 2011 at 11:23 AM
by huis
______
______
For My Reference
Wishlist
Rolling Pin
Bundt Cake Pan
Baking Thermometer
Food Processor
To-Do List
Aglio Olio
Any kind of Tart
Blueberry Pie
Bread
Chicken Rice
Cinnamon Rolls
Chocolate Mousse
Ice-Cream
Lava Cake
Marble Cake
Perfect Whole Roasted Chicken
Pineapple Tarts
Potato Chips
Preserved Vegetable Duck Soup (咸菜鸭汤)
Scones
Tiramisu
Rolling Pin
Bundt Cake Pan
Baking Thermometer
Food Processor
To-Do List
Aglio Olio
Any kind of Tart
Blueberry Pie
Bread
Chicken Rice
Cinnamon Rolls
Chocolate Mousse
Ice-Cream
Lava Cake
Perfect Whole Roasted Chicken
Pineapple Tarts
Potato Chips
Preserved Vegetable Duck Soup (咸菜鸭汤)
Scones
Tiramisu
Written on Monday, July 18, 2011 at 12:01 PM
by huis
______
______
Roasted Pork
My attempt at making roasted pork was actually a month ago, but I got lazy about blogging and hence am only writing about it now. :P
I’ve always loved roasted pork – the saltiness of the meat, the crispy, oh-so crunchy skin, even the juicy lard… not every stall gets it right, but when they do, it is PORKY HEAVEN. With this dish sold practically everywhere in Singapore, though, it has never actually crossed my mind to try it out.
A while ago, though, I came across this programme on Mediacorp’s Channel 8. It was called Ladies Night (or something). There was this segment where a guest was invited to make a few of his/her signature dishes, and that particular week, this guy made roasted pork and apple sauce. I knew at once that I had to try it. Not only was it one of my favourite meats, there was also apple sauce – so reminiscent of my favourite childhood series, Enid Blyton’s Famous Five! The characters sometimes ate apple sauce with pork, and the descriptions always sounded so good. I’ve always wondered what it tasted like.
I managed to copy down the ingredients but not the measurements, so everything was done roughly. For the pork I used (bought from a local supermarket and not a big slice, though please forgive me when I say I’ve completely forgotten the exact weight), I used roughly a tablespoonful of each ingredient. For the more flavourful or salty ingredients, such as five spice powder and salt, I used slightly lesser. The result was wonderful, and my family polished it all off quickly. I’m still puzzled over one thing, though. The skin took a much longer time to become crispy in my oven as compared to the time indicated in the recipe, which is the time that I copied from the programme. When it was finally alright, it was just a little too hard, and though still tasty it was very difficult to cut through. Sadly, all the accompanying vegetables that were also roasting in the baking dish were completely burned. Perhaps my oven wasn’t hot enough and hence the time taken ended up as much longer? I would have to try again next time – no complaints there!

As for the apple sauce, it didn’t disappoint. Tangy and slightly sweet, it went perfectly with the pork, and was also good on its own. It makes re-reading my childhood classics so much more pleasurable :)

Roasted Pork Belly
Ingredients
Oyster Sauce
Garlic, minced
2 garlic cloves
Five Spice Power
Salt
Carrots, sliced
Onions, sliced
Star Anise (八角), about 2 or 3 will do
Oil
1 small cup of water
1 piece pork belly
Directions
1) Marinate pork with oyster sauce, minced garlic and five spice powder. Flip over and apply salt.
2) Put pork in the fridge and leave overnight. Do not cover!
3) NEXT DAY: Place sliced carrots and onions into a baking dish, followed by the star anise (八角) and 2 cloves of garlic.
4) Place the pork in the baking dish. Apply some oil and salt onto the pork skin.
5) Pour in one small cup of water. Be careful not to get any water on the skin!
6) Bake for 90 minutes at 200 degrees celcius. (I took longer, for some reason.)
Apple Sauce
Ingredients
Green Apples (I used about 3)
~one tablespoonful butter
~one tablespoon brown sugar
Water
Chilli Powder (optional - I didn't use any as my sister cannot take spicy foods)
Directions
1) Peel and slice green apples.
2) In a saucepan, melt butter and brown sugar. Stir fry and add some water until the mixture is smooth.
3) Add apples and continue stirring until the apples are soft and mushy.
4) Add chilli powder if desired.
5) Serve. Enjoy!
I’ve always loved roasted pork – the saltiness of the meat, the crispy, oh-so crunchy skin, even the juicy lard… not every stall gets it right, but when they do, it is PORKY HEAVEN. With this dish sold practically everywhere in Singapore, though, it has never actually crossed my mind to try it out.
A while ago, though, I came across this programme on Mediacorp’s Channel 8. It was called Ladies Night (or something). There was this segment where a guest was invited to make a few of his/her signature dishes, and that particular week, this guy made roasted pork and apple sauce. I knew at once that I had to try it. Not only was it one of my favourite meats, there was also apple sauce – so reminiscent of my favourite childhood series, Enid Blyton’s Famous Five! The characters sometimes ate apple sauce with pork, and the descriptions always sounded so good. I’ve always wondered what it tasted like.
I managed to copy down the ingredients but not the measurements, so everything was done roughly. For the pork I used (bought from a local supermarket and not a big slice, though please forgive me when I say I’ve completely forgotten the exact weight), I used roughly a tablespoonful of each ingredient. For the more flavourful or salty ingredients, such as five spice powder and salt, I used slightly lesser. The result was wonderful, and my family polished it all off quickly. I’m still puzzled over one thing, though. The skin took a much longer time to become crispy in my oven as compared to the time indicated in the recipe, which is the time that I copied from the programme. When it was finally alright, it was just a little too hard, and though still tasty it was very difficult to cut through. Sadly, all the accompanying vegetables that were also roasting in the baking dish were completely burned. Perhaps my oven wasn’t hot enough and hence the time taken ended up as much longer? I would have to try again next time – no complaints there!

As for the apple sauce, it didn’t disappoint. Tangy and slightly sweet, it went perfectly with the pork, and was also good on its own. It makes re-reading my childhood classics so much more pleasurable :)

Roasted Pork Belly
Ingredients
Oyster Sauce
Garlic, minced
2 garlic cloves
Five Spice Power
Salt
Carrots, sliced
Onions, sliced
Star Anise (八角), about 2 or 3 will do
Oil
1 small cup of water
1 piece pork belly
Directions
1) Marinate pork with oyster sauce, minced garlic and five spice powder. Flip over and apply salt.
2) Put pork in the fridge and leave overnight. Do not cover!
3) NEXT DAY: Place sliced carrots and onions into a baking dish, followed by the star anise (八角) and 2 cloves of garlic.
4) Place the pork in the baking dish. Apply some oil and salt onto the pork skin.
5) Pour in one small cup of water. Be careful not to get any water on the skin!
6) Bake for 90 minutes at 200 degrees celcius. (I took longer, for some reason.)
Apple Sauce
Ingredients
Green Apples (I used about 3)
~one tablespoonful butter
~one tablespoon brown sugar
Water
Chilli Powder (optional - I didn't use any as my sister cannot take spicy foods)
Directions
1) Peel and slice green apples.
2) In a saucepan, melt butter and brown sugar. Stir fry and add some water until the mixture is smooth.
3) Add apples and continue stirring until the apples are soft and mushy.
4) Add chilli powder if desired.
5) Serve. Enjoy!
Written on Sunday, July 17, 2011 at 6:35 PM
by huis
______
______
Nutella Brownie
I know, I know... Nutella again?
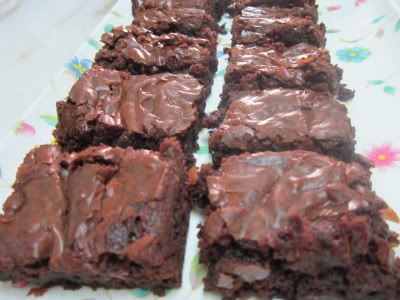
This one was different. I'm personally a big fan of chewy brownies, and these Nutella Brownies turned out to be just that! The Nutella taste was subtle yet present; while I thought it was just right, a friend suggested I should increase the amount next time. The best thing about these though, in my opinion, is the texture. Also, a big plus is that they are super easy to make!
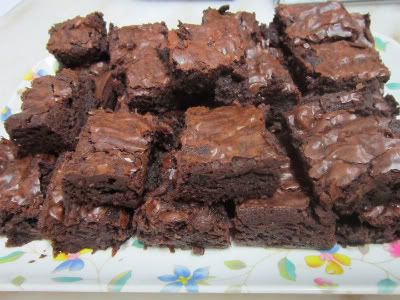

I actually made these quite some time back. It was still school term and in the midst of the hustle and bustle, I decided to take a short break and do some baking. It has been getting harder for me to find time to bake lately, so I've just been making use of any free time I've had.
Unlike my Nutella Pound Cake, these brownies were delish. I've only tried making brownies a couple of times before and I only found them okay-ish. Yeah, they tasted chocolate-y and all, but they just weren't wonderful or anything. They were just very normal, very average brownies.

I got the brownie recipe from Life's Ambrosia (I'm rather ashamed to say that I am far too inexperienced to actually try experimenting and creating my own recipes). Click on the link for the recipe!
Written on Tuesday, May 10, 2011 at 10:57 PM
by huis
______
______
Failures and More
So in my previous post, I blogged briefly about my rather disastrous baking outcome this afternoon. I don't want to go into too much of the painful details, so I'll let the pictures do the talking:

This, my friends, is a Nutella Pound Cake. Or at least, it was supposed to be one. I took the recipe from Dana Treat, and the photos looked so incredibly yummy that I had to try it out for myself.
So confident I was that it was going to turn out a success that I didn't even check my oven settings.
Now, my oven is still relatively new and I'm still not too familiar with it. I suppose that's also partly the reason why I didn't notice that the oven was at the "spit-roasting chicken" setting instead of the normal "oven" setting.
My poor pound cake was charcoal black (at least on the top) within minutes!
Even so, I wasn't disheartened. I changed the setting back, thinking that I could just slice off the top layer of the cake later on. All seemed fine and dandy again. Then, I took out the cake, waited for it to cool (45 minutes to be safe) and tried to slice them.
They were stuck to my brand-new loaf tin. I must have put too little oil, or perhaps it was because I neglected flouring the tin, as usually I find spreading oil more than enough. Anyway, the cake turned out terribly un-cakeish. It tasted pretty okay, but appearance-wise it was just sad. The remains went into a plastic bag and down the rubbish chute.
Oh well.
I was planning to bake another cake tonight, but I got too tired and I don't think I want to see, taste or smell Nutella for some time, shocking as that may seem. So I cooked dinner instead -

And can I just say this - these were DELICIOUS. I can't get enough of the sauce. I didn't have peppercorn so I just used lots and lots of black pepper and it was good, but next time I'm going to try this with peppercorn. The sauce is addictive, especially with white rice!

This dish is comfort food - I love sesame oil and since young this has always been one of the dishes I would order from the economical rice stall. Finally, I get to re-create it! Mine turned out a bit bland though, another careless mistake - I forgot to adjust the amount of ingredients according to the amount of chicken I had.
And lastly, some random vegetable dish (broccoli and lettuce) that I quickly whipped up because, you know, vegetables are essential for completing a healthy meal!

Not exactly my best day at culinary attempts, it seems. It's disappointing, but at the same time it's failures like this that make me more determined to make my next attempt a great one. We all have to start somewhere, don't we? And one day when I stop feeling sick over the thought of Nutella, I'm going to give that pound cake a go again (with correct oven settings, of course!).
(So I wanted to post another much more successful baking attempt that I made a couple weeks ago, but as this post is getting too long already, I'm going to double-post! Phew - new post in a bit!)
Labels: cake, chinese, nutella, pound cake, savoury
Written on at 9:40 PM
by huis
______
______
chronicles of a novice baker

Hello! My name is Huihui, but I prefer to go by the easier-to-pronounce Huis. I'm a fresh University graduate, having majored in Psychology, and am currently desperately looking out for a job! I'm a novice baker and cook, and this blog chronicles my various attempts at these two hobbies of mine. It's a long learning process and I'm enjoying every minute of it!
If you would like to tell me something regarding my posts, or if you just want to say hello, do drop me an e-mail here.
Links
● Personal Tumblr
● Photography Blog
● Flickr
● Baking Wishlist
Archives